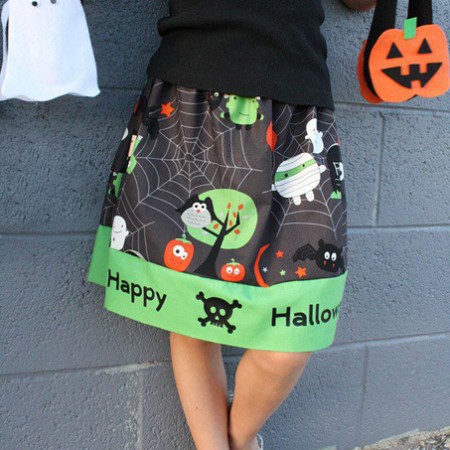
Quick and Easy Halloween Skirt
Quick and Easy Halloween Skirt Tutorial
Supplies
- Base Fabric 1 yard will be more than enough
- Hem Fabric 7x 44 inches
- Iron on Vinyl or Iron on Letters
- 1/2 inch elastic
Instructions
- To figure out how much fabric you need for the base fabric measure the length that you want and then subtract 2.5 inches. You want your fabric to be that by the width of your fabric most likely about 44 inches, if it’s a little more or less that won’t make a difference. For my niece who is 6 years old I used. To find how much elastic you need measure your kiddo’s waist and subtract 2 inches.
- Start by ironing the band in half lengthwise. Sew the raw side of the band to the bottom edge of the right side of the base piece. Finish the edges by serging or using a zig zag or overlock stitch.
- With right sides together sew the short sides of the skirt. You should now have a tube. Finish the edge and the top edge of the base fabric. Fold the top edge of the skirt over 1 inch to form a casing and sew leaving a space wide enough for your elastic. I like to do a zig zag stitch just for added cuteness. Leave a opening for the elastic. Use a safety pin and thread in your elastic. Stitch the ends of the elastic together and then close up the hole. You now have a cute Halloween Skirt.
- If you want to add extra details like I did use some iron-on vinyl and cut out your festive words or images. I used my cricut to do this. I found the font and images I wanted to use and then flipped the images so they were mirrored. Then I cut the vinyl. If you have never used Iron-on vinyl before it’s my new favorite craft supply, check out this tutorial for how to make custom iron-on vinyl.
- Once you have your design and have peeled away all the negative space trim each separate image or word and position it on your fabric plastic side up. Iron until stuck.
Love this recipe?Follow @RaeGunRamblings or tag #RaeGunRamblings!