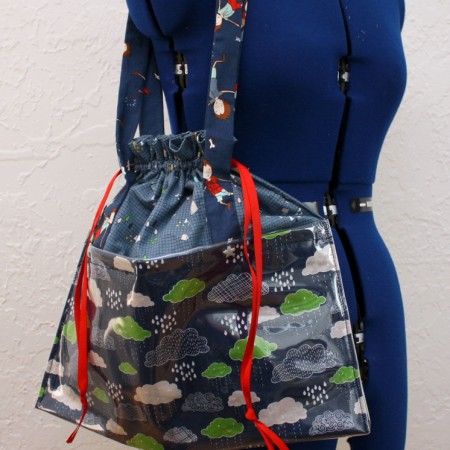
Vinyl Bottom Market Bag Tutorial
I have to say I'm totally smitten with this vinyl bottom market back and you will be too! I'm sharing an easy DIY tutorial and free pattern so we can all have new awesome totes.
Supplies
- 2 pieces 18″ x 18″ Main Fabric I used Adventure Camp Blue
- 2 pieces 10″ x 18″ Pocket Fabric I used Adventure Clouds Navy
- 21 ″ x 18″ clear vinyl
- 2 pieces 3″ x 36″ Strap Fabric I used Adventure Main Navy
- 2.5 yards Ribbon
- 2 snaps and snap setter optional, I used this kind
Instructions
- Sew the bottom of the main fabric together to make the bottom edge of the bag. If your fabric is directional pay attention to that.
- Do the same for the pocket fabric
- Serge (or zig zag) the top edges of both the main fabrics and the pocket fabrics.
- Iron the top edges of the pocket piece under 1 inch.
- Lay the clear vinyl over the right side of the pocket piece. Fold over the top edges and clip into place. I made a video about how to do this and how to sew with vinyl (the next step) you can watch it on guest post on the Riley Blake Designs blog!
- Sew across the one of the top edges with a 1/2 inch seam allowance making sure to catch all four layers (folded fabric and folded vinyl)
- Repeat on the other top edge.
- Lay the now vinyl covered pocket over the open a main fabric and pin at the bottom seam.
- On one side find the center and sew a line down the center of the pocket piece attaching it to the main fabric. This will create two smaller pockets on one side of the bag.
- Next make the straps. Iron each strap piece right sides together lengthwise and then sew using a 1/4 inch seam allowance.
- Turn right side out (I love using my loop turner for this, see about my loop turner love here). And then tuck the ends in and iron.
- Measure 4 inches in from the edge of the pocket and pin the strap to the main fabric about an inch below the pocket. Measure 3 inches up from the top of the pocket and place another pin.
- Pin the other side of the strap 4 inches in from the other edge.
- Repeat for the other side of the bag.
- Sew the straps on forming an X box at each end to reinforce the stitches. Sew along the sides from the bottom of the strap up to where you marked 3 inches above the pocket finishing in another X box.
- Serge both sides of the the bag fabric so that you finish the edges and attach the pocket to the main fabric. It should still be opened up at this point with the bottom seam in the middle.
- Next Iron the top edges under 3 inches.
- Sew a line across the top edges at the bottom edge of the fold (about 2.75 inches down from the fold).
- Sew another line 1/2 inch above that.
- Repeat on the other side of the bag.
- Next with wrong sides together fold the bag in half so the bottom seem is at the bottom. Tuck the side edges of the bag under to hid the serging and clip together.
- With a piece of tissue paper under the vinyl sew from the bottom of the casing to the bottom edge of the bag. Repeat on the other side.
- Peel off any remaining tissue paper.
- Thread one piece of ribbon in from the right side looping back in from the other side and then knot. Repeat with the other ribbon but starting at the left side.
- Now add snaps onto the large pocket side. Position the snaps right in front of the straps so that you attach them to the thicker part of the bag.
Love this recipe?Follow @RaeGunRamblings or tag #RaeGunRamblings!