DIY Pop Up Card Tutorial
Turn any picture into a fun card with this 15 minute DIY pop up card tutorial!
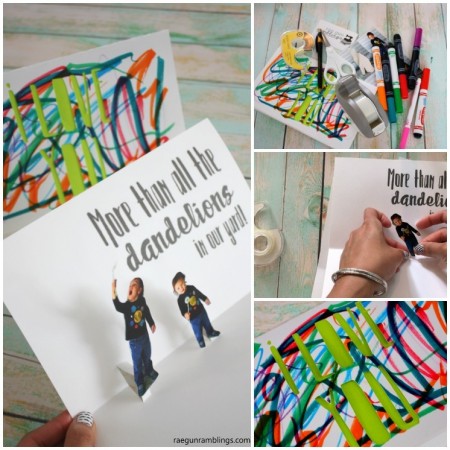
Supplies
- Markers
- 2 Sheets Card Stock
- 1 Sheet Colored Paper
- 1-2 photos
- Scissors
- Paper Cutter
- Tape
- Double Sided Tape
Instructions
- Fold your card stock pieces in half to form a card.
- Use the markers to draw on the front of one of the pieces of card stock (what will be the front of the card). This is a great step to get the kids involved in.
- Use a paper cutter, I used my Cricut Explore, to cut “I Love You” on the front side of the card. I used the Scratchbook font from the Font Collection bundle on FontBundle.net
- Next cut out your photo(s). Position it on the inside of your card to determine where you want your text.
- Print the inside of your card with “More than all the dandelions in our yard.” Or any other phrase you want. If you’re curious I used the fonts Scratchbook and Faithful both from the Font Collection bundle.
- Next cut two slits into the fold of the inside piece of your card for every pop up you want. These should be about 1/2 inch deep and about 1/8-1/4 inches apart. Then fold that piece in to form your pop up base.
- Using double sided tape (or glue) attach your cut out photo(so).
- Next cut your colored sheet so that it will cover your cutout front cover text and tape it to the back side of the cut out.
- With WRONG SIDES together tape the inner piece of card to the outer piece of card with double sided tape.
- Now your card is ready for a hand written note and gifting!
Video
Love this recipe?Follow @RaeGunRamblings or tag #RaeGunRamblings!