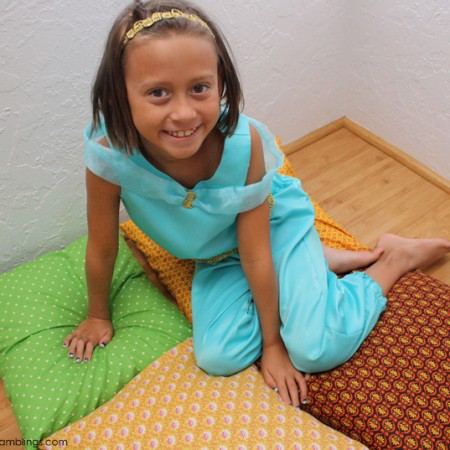
HOW TO MAKE A PRINCESS JASMINE TOP
Princess Jasmine Costume Tutorial tips for making your own pattern so you can make any size. Also works as a Genie costume.
Ingredients
- Shinny fabric I like Jo-Ann’s Casa Collection, don’t by costume satin it’s awful to sew with and won’t hold up
- Lining fabric I just used broadcloth
- Thin gold trim mine is about 1 inch for the headband and the front bodice piece
- Thick gold trim for the bottom of the shirt
- Sheer fabric about 1/4 yard
- A shirt that slips on without needing to be stretched for a pattern or basic bodice pattern pieces
- Gold Buttons for the back
Instructions
- Make your pattern by folding your shirt in half at the center front trace around giving yourself a half inch seam allowance. Repeat for the back.
- Cut out a front bodice piece and back 2 bodice pieces out of the shinny fabric and the lining. The front piece should be cut on the fold.
- With right sides together sew the bodice shinny pieces together at the shoulders. Repeat for the lining.
- With right sides together sew the shinny fabric to the lining around the neck and armholes.
- Flip right side out and iron.
- Sew the side seams by opening up the pieces and placing them right sides together and sewing down the line. You should have a basic top with the back open.
- Finish the bottom edge of the shirt so it doesn’t unravel either with a zig zag stitch or serger.
- Sew on your wide trim to the bottom of the shirt with a zig zag or 3 step zig zag stitch.
- Sew the back together leaving about 6 inches open at the top.
- Cut your sheer fabric 5 inches by the length of the fabric. Fold in half lengthwise and sew so it’s a long strap. Turn right side out. Pin in place on your bodice and cut any excess off. you want it to fit loosely around. Sew a small piece of gold trim to hold the “sleeve” pieces to the center front of the boddice.
- Fold the left side of the back piece under 1/2 an inch and sew. Top with buttonholes.
- Fold the right side under and sew. Top with buttons.
Love this recipe?Follow @RaeGunRamblings or tag #RaeGunRamblings!