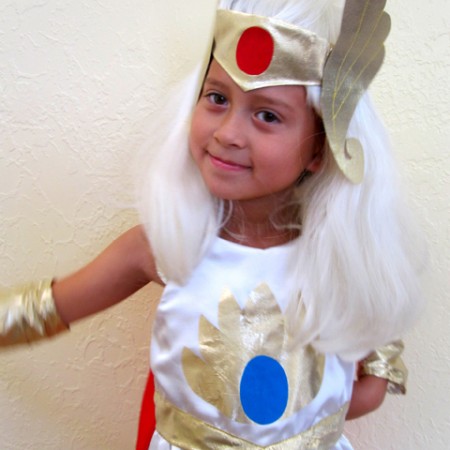
SHE-RA DRESS
She-Ra Costume tutorial. Step by step instructions on how to make your own shera princess of power costume.
Supplies
- White Fabric 1 to 1.5 yards
- Red Fabric fat quarter or 1/2 yard
- Gold Fabric 1/2 to 1 yard
- Blue Scrap 3x 3 inch square
- Ultra Hold Heat’n Bond
- Elastic
Instructions
The dress is made up of the following pieces:
- Bodice front it’s got the kind of sweetheart neckline (white)
- Bodice back which is just a rectangle that I add elastic to (white)
- Neck straps the dress ties around the neck (white)
- Skirt just a rectangle gathered and attached to the bodice (white)
- “belt” this is gold and I sewed it down onto the dress as the last step.
- Design made of gold and blue fabric and heat bond
- bodice wings made of gold and heat bond
- Draft a bodice front piece. Either use a pattern piece that you know fits your kiddo or like I did trace a shirt that fits well and add the neckline you want and have a little extend from where it would go under the armpit. Cut two of these.
- Cut a rectangle that is the same height as the side of the bodice front and 1.5 times whatever else you need to cover the back of your kiddo. You need to of these.
- Then sew the short edges of the back to the sides of the the bodice. Repeat for the other pieces.
- With right sides together sew around the top edge. Snip along any curves and turn right side out and iron.
- Next cut a few strips of 1/8 to 1/4 inch elastic and while stretching zig zag this to the back piece. I used a few rows. This was so it fit securely but could easily be put on.
- For the skirt piece measure from where the bodice ends to how long you want the skirt. And make a rectangle that measurement by the full width of the fabric.
- Sew the sides together to form a tube.
- Gather the top edge. My favorite way of gathering skirts is by using crochet thread but feel free to use whatever way you’re comfortable with. If you’re interested I do have a gathering tutorial for the way I mentioned.
- Gather the skirt to fit to the bodice and pin right sides together. Attach the skirt and you should have the basic form of a strapless dress.
- Make the straps by taking strips of fabric 3 inches wide by however long you need to tie. Fold the strips in half lengthwise and sew one short edge and the long edge then turn right side out and iron.
- Make the gold wing details by ironing gold fabric to ultra hold heat bond. Remove the back side of the heat bond then iron on another piece of gold fabric. Then trace the shapes you want. I added some stitch lines for a little extra detail in yell.
- Next tuck under the end of the strap so there are no raw edges. Position and pin the gold piece in place with the end of the strap underneath. Stitch along the rounded edge of the bodice attaching both the strap and the gold piece. Repeat on the other side.
- To make the bodice detail make some iron on fabric using heat bond and blue fabric. Cut out leave shapes from the gold and an oval from the blue. Position on the bodice and iron.
- Cut the belt band I just drew a band with a slight V in it. The V can’t be too deep since you don’t want the seam that attaches the skirt to the bodice to show. Cut two of these leaving 1/2 inch seam allowance. Sew together along the top and bottom and snip where the points are flip right side out and iron.
- Pin to the dress and top stitch along both edges.
- Hem the skirt.
- Now you should have the main dress done.
SHE-RA CROWN
- The crown is made of the following pieces:
- Head band (with point) gold
- Red jewel red fabric with heat bond
- Side gold things heat bond sandwiched between heat bond
- Make the headband by drawing a band with a point coming down. This needs to be long enough to wrap around the head plus a little room for seam allowance. Don’t forget to account for wig if one will be worn. Cut two sew, snip along points and flip right side out and iron.
- Make red iron on fabric. Cut an oval. Iron “jewel” to the crown.
- Make the wing parts of the headband like you did with the bodice wing parts. You want a left and a right side. I sketched out the shape on paper then traced it and cut it out from my gold sandwiched heat bond. Again I stitched some designs in yellow.
- Grab the head in question and fit the band part marking where to sew. Then position the wing parts and mark where to attach those.
- Sew the band by tucking the end in of one side and stuffing the other end in the tube so no loose edges are seen. sew across so that you have a basic crown.
- Sew the wing parts where you marked them. I just sewed down one of the decorative lines.
- Your crown should be finished
- The arm and leg cuffs are made of:
- gold rectangles as tight as possible but still loose enough to slide over the hands and feet
- Measure how long you want the cuffs and add an inch to the height. Use some fabric form a tube and see if your kiddo can slight her hand/ foot in to get the right width. The foot one is going to have to be bigger than you’d thing to get past the heel and fit over the calf. Once you get that measurement add an inch
- Cut two rectangles the height by the width for the arms cuffs and the leg cuffs.
- Sew the long side of one of the cuff pieces together to form a tube. My picture shows sewing on both sides (that’s just because I messed up and was using less fabric). Repeat for the other pieces so that you have 2 arm tubes and 2 leg tubes.
- Fold the ends over and hem.
SHE-RA CAPE
- How cute is this She-Ra Costume. Yay princess of power full tutorial #halloween #diy #costume #geek - Rae Gun Ramblings
- The cape is just a piece of red fabric that I have hemmed on all sides that I pinned to the dress straps. Hopefully that made sense. Let me know if you have any specific questions in the comments. And don’t forget to check out the read of The Really Awesome Handmade Costume series over at Really Awesome Costumes site and CRAFT. If you want to see more of my costume tips, tricks, and tutorials check out my costumes tag. And now I need an aunty moment because T looks so much older in less than a year later.
Notes
The measurements are estimations and T was in a size 5-6T when I made this. A word on fabric. I don’t buy costume satin (that 100% acetate crap). That’s the stuff they make costumes of that snags and frays like crazy. If I’m going to go through the trouble of making something even though the workmanship may be a little lax I want it to hold up. Because honestly with costumes you never know which is the one the kiddo will fall in love with and want to wear over and over.
Love this recipe?Follow @RaeGunRamblings or tag #RaeGunRamblings!