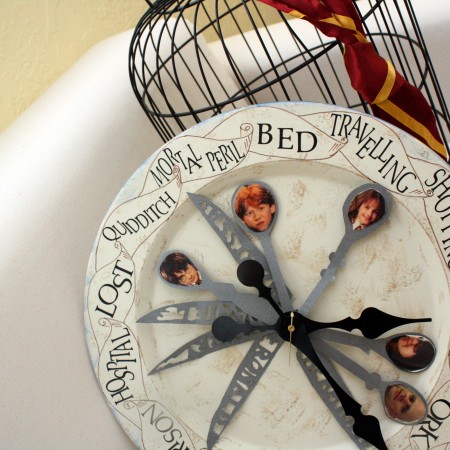
Weasley Family Clock Tutorial
Every true Harry Potter fan can remember Molly Weasley's great clock. Why not make your own with this Weasley Family Clock tutorial.
Supplies
- Wooden Plate mine was 15 inches in diameter
- Clock Kit
- Large Clock Hands
- Dimensional Magic
- Pictures Printed see image below
- Distressing Ink brown and blue
- Black Vinyl
- Sliver Scrapbook Paper
- Double Sided Tape
- Brown Marker
- Yarn or String for measuring
Instructions
- Start by drawing the scrolls onto the lip of your plate. You want to have 13 equal sections. I figured this out by using yarn to get the circumference and folding it in 13 equal parts and marking the sections (I could have done math but it made more sense for me to see it this way). Using a pencil I freehanded the scrolls.
- Find the center of the plate and drill a hole. Make sure it’s wide enough to fit your clock piece.
- Cut the locations you want out of vinyl. Even though the film clearly shows “dentist” as a possible location, since there was that thing suggesting that wizards don’t have dentists (remember everyone was confused when Hermione said her parents were dentists) I couldn’t bring myself to put that so my lists includes a mix of locations from the book and movie. I did: Mortal Peril, Bed, Travelling (I went for the British spelling), Shopping, Forest, Work, Garden, School, Home, Prison, Hospital, Lost, and Quidditch. Affix the vinyl and then trace the scrolls and add any desired accents.
- Next print the faces you will be using onto cardstock. Cut them out and with double sided tape attach them to the silver paper. Cut spoon shapes from the silver paper. Next add some dimensional magic to the pictures to make them shinny and look like they are in glass. Allow to dry for a couple hours.
- Use distressing ink to make the plate look old. I used brown all over and since the film version had blue accents I used blue around the edges.
- Cut out the name hands of the clock. You can use the template I made below or make your own. I tried a bunch of different ways but I found using an exacto knife was the easiest route. Make sure your end part is at least triple the size of the clock piece it will fit onto (I had to add more paper). Then punch holes in the edge. I had to punch twice to make the hole big enough to fit onto the clock.
- Finally fit the different hands onto the clock as well as the clock hands.
Love this recipe?Follow @RaeGunRamblings or tag #RaeGunRamblings!