ALICE THROUGH THE LOOKING GLASS NAIL TUTORIAL
Learn how to do Alice Through the Looking Glass Nails at home. Fabulous step by step tutorial for nail stamping art.
Supplies
- Base Coat
- Let’s Snow Sally Hansen
- Black: Mo You London Stamping polish
- Gold Stamping polish – Born Pretty
- Green Polish
- Maroon Polish: Sally Hansen
- Purple Polish: Sally Hansen
- Teal Polish: Wet and Wild
- Top Coat stamping friendly used on color polish and on stamping polish
- Stamping Plate: MoYou London Alice 01 and 07
- Clear Stamper
- Mini Scrapper: but you can use an old gift card
- Acetone nail polish remover
- “clean up brush”
- tooth pick
- Scotch Tape any tape will work
- Cotton Make up Cleaning pads
- Paper Towel
- Top Coat don’t use directly on stamping polish:
- Sally Hansen Dry Kwik
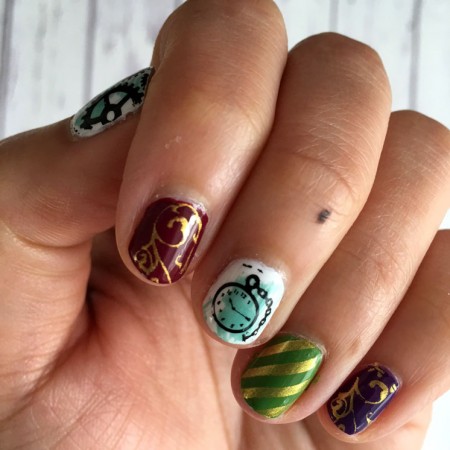
Instructions
- Apply a base coat.
- Apply the solid color coats.
- Apply a few brushes of teal to the white nails.
- Stamp your gold stripes onto your green nails.
- Clean your stamping plate with acetone.
- Apply a thin layer of stamping nail polish to your stamping plate.
- Scrap the excess paint off with a scrapper or old gift card.
- Roll the stamper across the stamping plate to life the remaining nail polish.
- Roll the stamper across your nail to transfer the nail polish to your nail.
- See here for a more in depth treatment of how to do nail stamping.
- Stamp the scroll design on to your maroon and purple nails with gold.
- Stamp the clocks and gears on white black onto the White and teal nails.
- Use a STAMPING FRIENDLY clear top coat.
- Use a clean up brush and acetone to tidy up your nails and use tape to remove the paint from your skin. This can be done as you go as well.
- Optional finish with another layer of top coat.
Video
Love this recipe?Follow @RaeGunRamblings or tag #RaeGunRamblings!