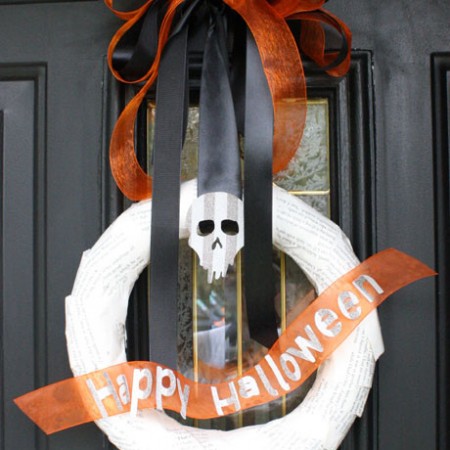
Spooky Bookish Halloween Wreath Tutorial
A fun and festive Halloween wreath that's great for both indoor decor as well as your front porch decorations.
Supplies
- Wreath form I used a foam one I found at the dollar store
- Mod Podge Outdoor
- Brush
- Scrapbook Paper/Letters and skull cut out
- Ribbon
- Book to destroy I always buy them at the dollar store
- Double Sided Tape
- Stiffy fabric stiffening agent
- Glue
Instructions
- Tear some book pages into strips. You can do it smaller if you like that (you can see an example in my book page ornaments) but I wanted it to look more wrapped. I use double sided tape just to hold the pieces in place. Set aside
- Measure how long you want your “banner” to go adding some room for ripples. Paint the ribbon with a generous amount of Stiffy. It comes out looking like watery glue. Then position to add some ripples. Allow to dry completely
- Cut your scrapbook paper. I did mine on my Cricut. The skull is from the “monster bash” cartridge. You can just as easily use pre-cut letters and images from the store.
- Paint your wreath with a generous coat of Outdoor Mod Podge.
- Repeat with your letters and skull. Allow to dry completely.
- Glue or tape your ribbon in position on your wreath.
- Glue the letters in place.
- Make your ribbon by folding both colors in a few loops.
- Then with a smaller piece of ribbon tie a knot around both loops. Then leaving a little space between tie another knot. This will be how you slide the ribbon onto the wreath hook
- Look your hanging piece of ribbon and tie two knots like you did for the bow and then a third to secure the outer knot.
- Hang the wreath and top with the bow.
- With a piece of double sided tape or some glue attach the skull
Love this recipe?Follow @RaeGunRamblings or tag #RaeGunRamblings!