Elastic Back Panel Tutorial Sewing Fit Hack
Make handmade dresses to fit a little long, sew maternity wear, and make flexible sizing with this Elastic Back Panel Tutorial.
Supplies
- Bodice pieces included your adjusted bodice back pieces.
- 1/8 inch elastic 1-2 yards should be plenty
- Ruler
- Fabric marker or pencil
Instructions
START BY ADJUSTING YOUR BODICE BACK PATTERN PIECE
- You can do this to pretty much any dress pattern that has a bodice attached to a skirt. What you need to do is convert your bodice back piece so that it’s the finished width plus about 4.5 inches. That will give you 4 inches for the elastic panel and 1/2 inch seam allowance. So read through the direction of your pattern if it’s made for you to put in a zipper see how much is allowed for that subtract it and then adding 2.25 inches to the center back edge. Alternatively you can take a bodice back that you have used with knit (stretchy) fabric and add the 2.25 inches to that.
ASSEMBLE YOUR BODICE
- The first step is to put your bodice together so you can do it how you prefer. I’m just going to give the directions for a lined bodice like I did here. You can do sleeves set in or sewn in before side seams you just need to have a finished bodice with 4 inches extra space in the back to put in the elastic. I do 4 inches both for kids and for adults.
- If your bodice front has darts sew those in to both the bodice pieces and the lining pieces.
- Sew the front pieces to the back pieces at the shoulders with right sides together (you should have two back pieces and one front piece). Repeat for lining.
- With right sides together sew around the neck edges and and arm holes. If doing sleeves you can put your sleeves in before or during this step if you have cap sleeves or do set in sleeves later.
- Turn right side out by reaching in through the center back and pulling the fabric of the other side through.
- Press with an iron.
- Open the back up and and sew it together matching the lining fabrics to each other and the back fabric to each other. Not like this ;) This is just to close up the back.
- Now you should have a finished bodice that is a closed tube with an extra 4 inches.
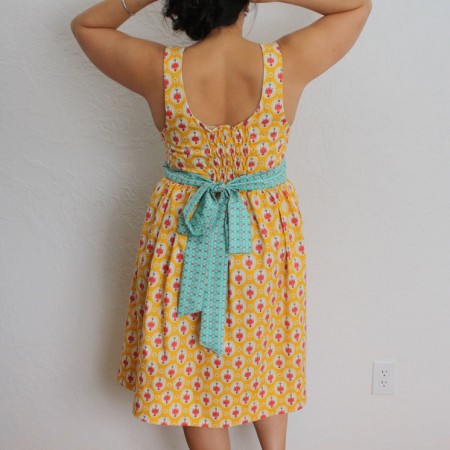
- I do this all the time now. Great for maternity, kids, or just flexible fit clothes sewing. Easy to follow tutorial for putting in an elastic back panel.
PUTTING IN THE ELASTIC
- Basically you sew rows of elastic across the back. I like to zig zag over my elastic and do the rows in 1 inch increments with the bottom row as close to the stitching line to attach the skirt as possible.
- Turn your bodice right side out. I like to serge around the bottom edge just to hold everything in place and pin along the back center seam.
- Using your fabric marker draw a vertical line parallel to the center back seam but 3.5 inches to the left. Repeat 3.5 inches to the right of the center back.
- Draw a horizontal line 1/4 inch from the top edge.
- Draw a line 1/8 inch from where you will attach your skirt to the bodice at the bottom edge. For example I used a 1/2 inch seam allowance so I put my lowest line at the 5/8 inch line.
- Now draw lines about 1 inch about in between those two lines. Depending on how high your bodice is it might not be perfectly 1 inch but I think that’s a good gap although I’ve done larger and smaller gaps before.
- Set your machine to a zig zag stitch that will sew on and through the elastic making sure it sews through the elastic at at least one side of the stitch.
- Position your elastic on one of the lines that run horizontally across your bodice. Back stitch a few times and then pull the elastic as tight as you can. I usually put have my left hand hold the fabric that is behind the needle and I pull it that way while using my right hand to pull the elastic away from the needle and feed the bodice in. You might want to practice this on some scrap fabric your first few times.
- While the elastic is pulled as tight as possible zig zag over the elastic sewing it down to the line stopping at the vertical line you drew and making sure to back stitch.
- Cut the elastic and threads.
- Repeat for every horizontal line you drew.
- Now you should have your bodice piece with a gathered elastic back panel.
- You can attach the skirt but make sure to allow for some ease in the skirt through portion that attaches to the back panel. I stretch the elastic out while I sew the through that area so it can stretch over my shoulders and bust without a problem.
- Super cute DIY dress with great sewing tutorial.
Notes
I have attached a fully gathered skirt like the one on this cat dress but I’ve also done a non-gathered aline skirt for a few dresses I made while I was pregnant. I still wear these often post-babe.
Hands down the only way I'll gather when I'm sewing. Great trick every sewist should know and use.
If you are doing doing a fully gathered skirt I highly recommend using my cheater gathering method to gather your skirt piece it makes it so easy to get the gathers even while never running the risk of snapping your basting threads.
Love this recipe?Follow @RaeGunRamblings or tag #RaeGunRamblings!