

I have a thing for buntings and pennants and banners. I think they are fantastic. And tiny ones are even better. I made this easy mini paper bunting for a friend’s birthday cake and thought I’d share the easy technique and my tip for transporting it without getting it all tangled and knotted.

First to make the bunting figure out if you want a patter for your letters/colors and print out your letters. Next I like to draw a top line. This will be the top edge of each flag. I’ve said many times before I am not a perfectionist so from here I just cut points. I liked that each flag was a little different but if that will bug you by all means measure away.

After you arrange the flags in order (and triple check it) pull a long take on your sewing machine. You can always cut it shorter. Then just start sewing. You don’t need to change your presser foot, needle or anything but if you sew a lot on paper it may dull your needle so you might want to change it when you go back to sewing fabric (I did not). Just sew and add the next flag being mindful of spacing. At the end leave a long tail.

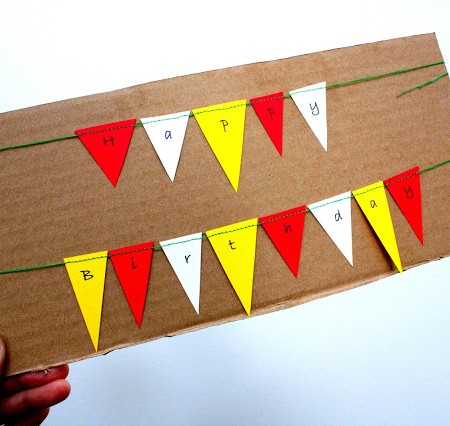
If you are not going to use the bunting right away I find it super helpful to wrap it around a piece of cardboard and attach a few pieces of tape. So much better than dealing with a tangled mess and trying not to rip paper when you’re dealing with other last minute party details. To put it on the cake just stab the cake with some skewers and tape or tie the string on. Super fast and easy but adds a really cute detail.
Mini Cake Bunting Tutorial
Ingredients
- Colored paper
- scissors
- printer
- sewing machine
- skewers
Instructions
- First to make the bunting figure out if you want a patter for your letters/colors and print out your letters.
- Next I like to draw a top line. This will be the top edge of each flag.
- I’ve said many times before I am not a perfectionist so from here I just cut points. I liked that each flag was a little different but if that will bug you by all means measure away.
- After you arrange the flags in order (and triple check it) pull a long take on your sewing machine. You can always cut it shorter.
- Then just start sewing. You don’t need to change your presser foot, needle or anything but if you sew a lot on paper it may dull your needle so you might want to change it when you go back to sewing fabric (I did not).
- Just sew and add the next flag being mindful of spacing.
- At the end leave a long tail.
- If you are not going to use the bunting right away I find it super helpful to wrap it around a piece of cardboard and attach a few pieces of tape. So much better than dealing with a tangled mess and trying not to rip paper when you’re dealing with other last minute party details.
- To put it on the cake just stab the cake with some skewers and tape or tie the string on.


Roslyn@Sew Delicious says
Ohh that caterpillar cake – too cute! The bunting looks awesome :)
marissa | Rae Gun Ramblings says
aww thanks!
imklvr says
HI! I’ve only been following you for a short time, but I’ve been aware of you around blogland for quite a while. SO glad I’m on board! (It was the German pancake that got me). Love this idea! Looking forward to more! Dona
Kassi Mortensen says
Love the transportation idea!!! Mini anything is so fun!
Rebecca @ Herons Crafts says
This is so cute! The cake is adorable – I am a big Hungry Caterpillar fan and this reminds me so much of that! Thanks for the great tip for transporting the bunting!
marissa | Rae Gun Ramblings says
It was actually for a Hungry Caterpillar party. I’ll share more pictures from the event soon it was super cute
Tamsyn says
This is such a sweet cake! I look forward to seeing the rest of the photos :)
Summer Rumsey says
So cute. Love the banner and cake! I like the transportation idea as well. Thanks!
malia says
That’s adorable Marissa! Pinned!
Diana - FreeStyleMama says
Super cute! Great way to carry it!
CraftyMummy says
Love this idea! And so easy… or maybe that should be “sew easy” ;o)
Rachel says
I love cake decorating ideas that aren’t always edible and that one is super cute!