
Disney’s Frozen Anna costume tutorial plus over 80 other awesome halloween costume ideas for the kids. Ummm you got it!
You guys KNOW I love a great sibling costume! Themed costumes are really my favorite!
80+ blog buddies and I got together to bring you 80+ DIY Halloween costumes, including my Frozen Anna and Kristoff! I’m teaming up with Jamie Dorobek and her handmade Halloween costume site, Really Awesome Costumes to bring y’all tons of easy ideas to craft up DIY Halloween costumes for everyone including your pets, family costumes, and even a trunk or treat idea!
Along with my Frozen Anna Dress Tutorial, I’m sharing 88+ more really awesome handmade costume ideas from talented bloggers everywhere! 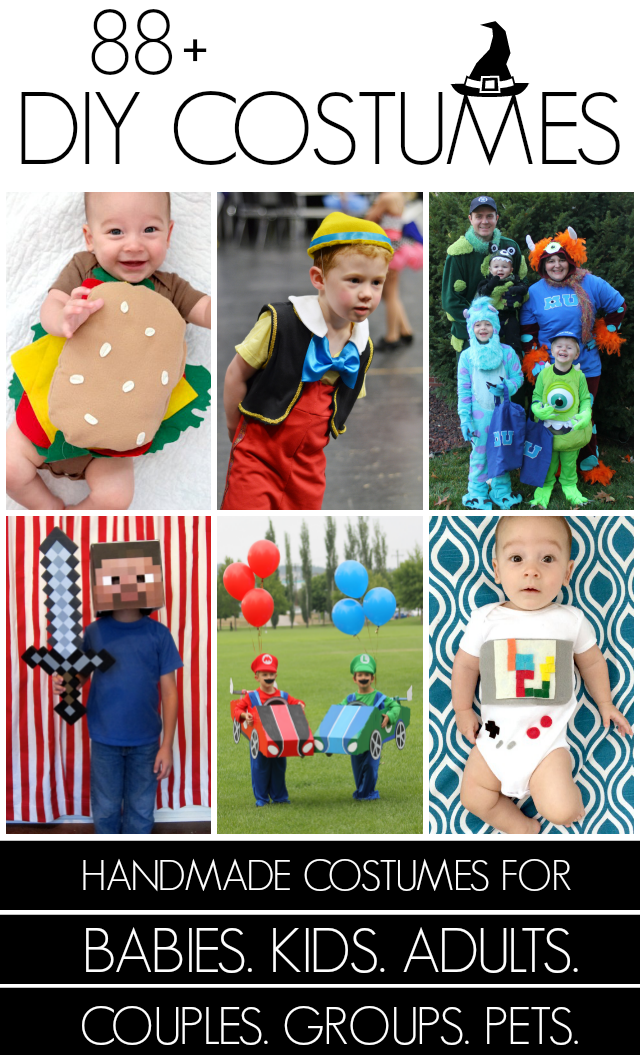
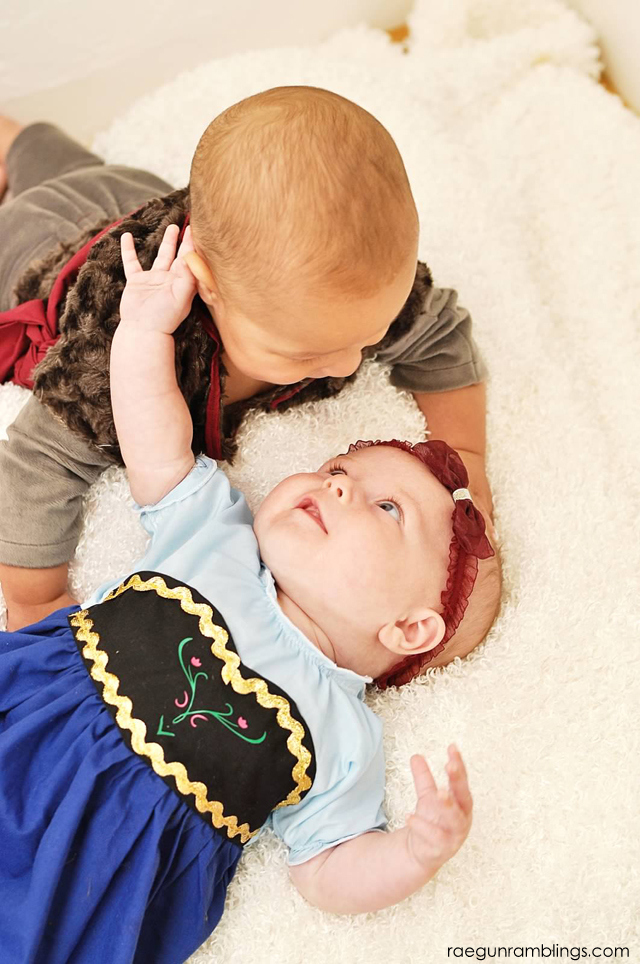
After the fun of Teddy’s Baby Harry Potter Photoshoot Debra from Joyous Moments Photography and Housewife Eclectic and I cannot stop taking pictures of our babies dressed up.
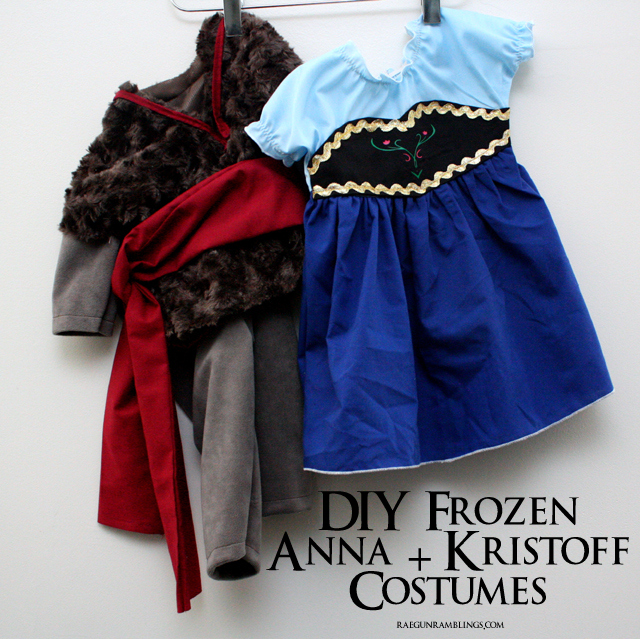
This month I present you Baby Anna and Kristoff from of course Frozen staring Teddy as Kristoff and Hailey as Anna.

I know we’re kinda crazy but I know a lot of you guys are too because when Debra put a teaser picture up from photo day people went crazy.
So not only do you get silly cute pictures but I’m also sharing how you can make your own Anna costume! You can use this tutorial to make a baby version like I did or and older child the only difference more fabric!
And don’t fret, I will be sharing how to make your own Kristoff costume next week so you too can have the pair!
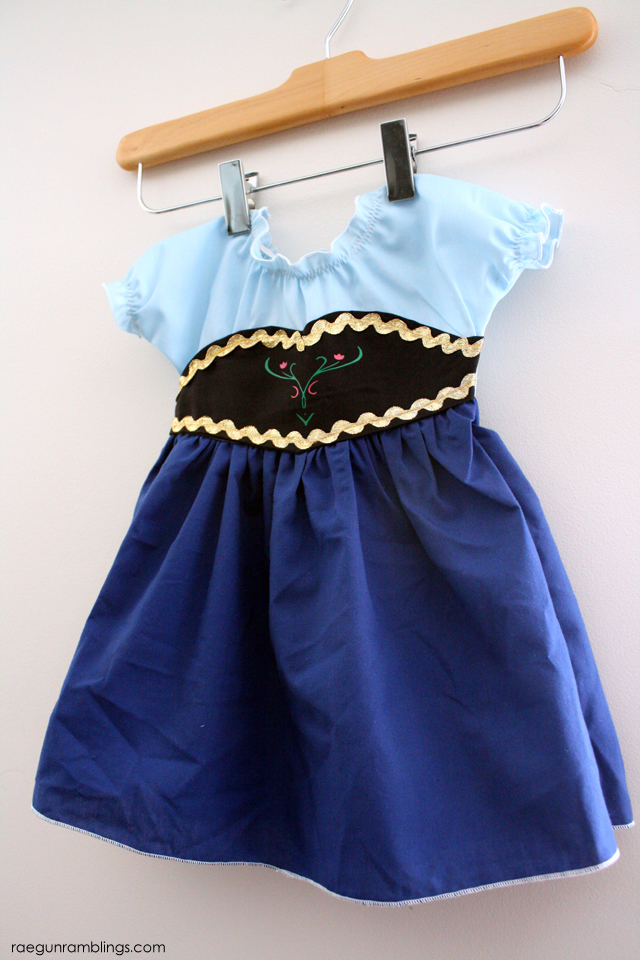
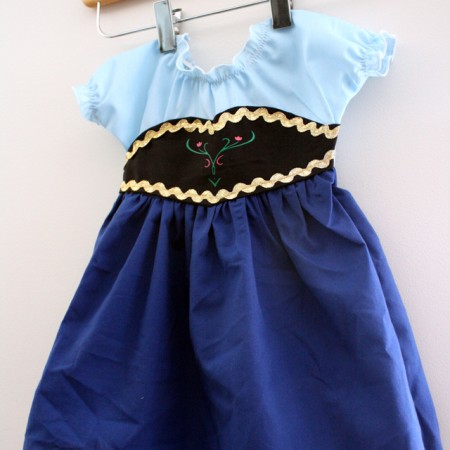
Frozen Baby Anna Costume Tutorial
What You Need
- Black Fabric (bodice)
- Pale blue Fabric (sleeves)
- Dark Blue Fabric (skirt)
- 1/8 inch elastic
- Gold Rick Rack
- Pink Iron-on Vinyl
- Green Iron-on Vinyl
- Zipper or buttons (optional)
What To Do
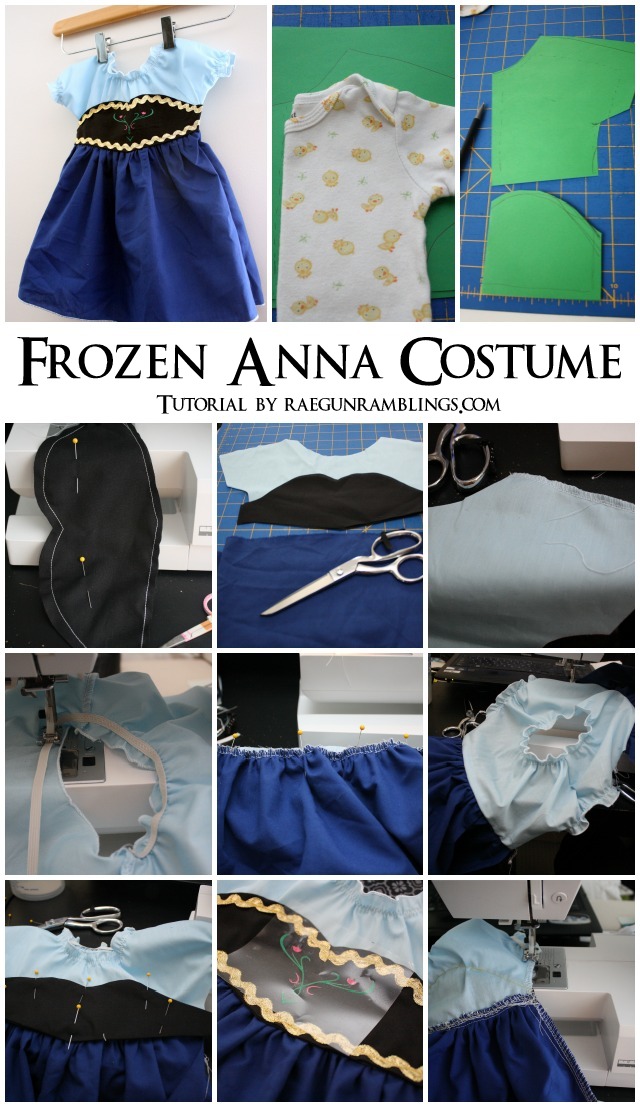
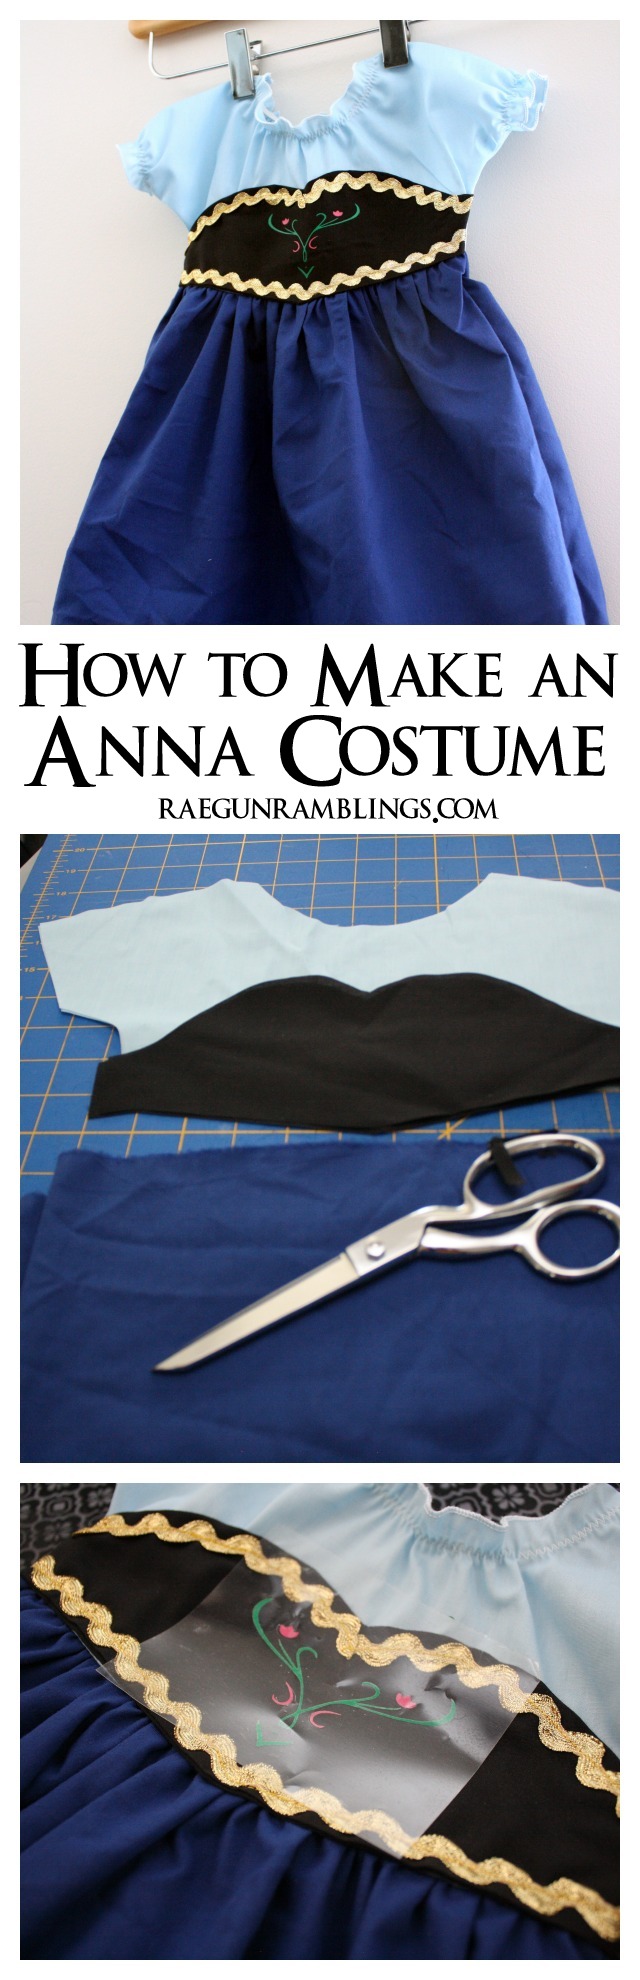
- Make yourself a bodice pattern by tracing around a loose fitting shirt. Make sure to add a cup inches at the shoulders (baby size I added 2 inches you’ll want more for larger sizes since this will determine how gathered it is. Make the sweetheart pattern piece by drawing a curve on your bodice piece so it’s the write shape.
- Cut out your pattern pieces for the top on the fold. You want 2 pieces (one will be the front the other will be the back). For the black also cutting on the fold you need two pieces. The skirt piece is just a big triangle. You’ll want it the length of your desired skirt plus 1-2 inches for seam allowances and hemming by 44 inches for a baby (for an elementary kid I’d do 44 or if you want it really full do 88 inches). Cut the skirt piece so that you have a front and back
- Sew the black pieces together along the top and bottom leaving the short edges open. Snip to the sewing line and turn right side out. Iron.
- Sew the bodice pieces right sides together at the shoulders.
- Finish the neck and sleeve edges. I did this with a rolled hem on my serger you can also just do a narrow hem.
- Next sew in 1/8 inch elastic around the neck and the arms. Cut your elastic to what wide you want your neck (or arm holes) then zig zag the elastic in place about 1/2 an inch from the edge using a zig zag stitch and stretching the elastic as you go.
- Gather the top edge of the skirt.
- Pin the skirt and bodice right sides together and sew.
- Next pin the black piece in place and lay the gold rick rack on and sew the gold rick rack on. This will attach the rick rack while also attaching the black piece.
- Make your “applique” embellishments out of iron on vinyl. I just cut one design of pink and one of green on my Cricut and substituted the parts I wanted of the right color. And iron into place. If you’re new to iron-on vinyl it’s my favorite and here’s a great how to post about it.
- With right sides together sew down the underarm and side seams.
- Hem the skirt.
- If your waist is big enough you should be able to slip this over the your Anna’s head. So if you want make a point to make sure it’s big enough. If you want a more fitted look you can cut down the center back of the dress (I know it’s scary) and insert a zipper. This is what I did. You’ll want to cut from the neck line to a few inches into the skirt.
Awww aren’t they the cutest ever!!!? Don’t forget to check back in next week for the Kristoff tutorial. I’m hoping Debra and I can keep up the fun.
We already know what we’re going to do for November, I can’t wait to share it with you!
FROZEN BABY ANNA COSTUME TUTORIAL
Ingredients
- Black Fabric bodice
- Pale blue Fabric sleeves
- Dark Blue Fabric skirt
- 1/8 inch elastic
- Gold Rick Rack
- Pink Iron-on Vinyl
- Green Iron-on Vinyl
- Zipper or buttons optional
Instructions
- Make yourself a bodice pattern by tracing around a loose fitting shirt. Make sure to add a cup inches at the shoulders (baby size I added 2 inches you’ll want more for larger sizes since this will determine how gathered it is. Make the sweetheart pattern piece by drawing a curve on your bodice piece so it’s the write shape.
- Cut out your pattern pieces for the top on the fold. You want 2 pieces (one will be the front the other will be the back). For the black also cutting on the fold you need two pieces. The skirt piece is just a big triangle. You’ll want it the length of your desired skirt plus 1-2 inches for seam allowances and hemming by 44 inches for a baby (for an elementary kid I’d do 44 or if you want it really full do 88 inches). Cut the skirt piece so that you have a front and back
- Sew the black pieces together along the top and bottom leaving the short edges open. Snip to the sewing line and turn right side out. Iron.
- Sew the bodice pieces right sides together at the shoulders.
- Finish the neck and sleeve edges. I did this with a rolled hem on my serger you can also just do a narrow hem.
- Next sew in 1/8 inch elastic around the neck and the arms. Cut your elastic to what wide you want your neck (or arm holes) then zig zag the elastic in place about 1/2 an inch from the edge using a zig zag stitch and stretching the elastic as you go.
- Gather the top edge of the skirt.
- Pin the skirt and bodice right sides together and sew.
- Next pin the black piece in place and lay the gold rick rack on and sew the gold rick rack on. This will attach the rick rack while also attaching the black piece.
- Make your “applique” embellishments out of iron on vinyl. I just cut one design of pink and one of green on my Cricut and substituted the parts I wanted of the right color. And iron into place. If you’re new to iron-on vinyl it’s my favorite and here’s a great how to post about it.
- With right sides together sew down the underarm and side seams.
- Hem the skirt.
- If your waist is big enough you should be able to slip this over the your Anna’s head. So if you want make a point to make sure it’s big enough. If you want a more fitted look you can cut down the center back of the dress (I know it’s scary) and insert a zipper. This is what I did. You’ll want to cut from the neck line to a few inches into the skirt.
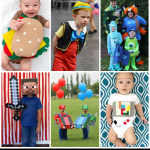
And now it’s time for tons more DIY Halloween costume inspiration! Join in on the BLOG HOP! Click on the links below each collage to get the detailed instructions about how to make the costume pictured, just like mine above. Don’t forget to follow the Handamde Halloween Costumes Pinterest Board for even more DIY costume greatness! 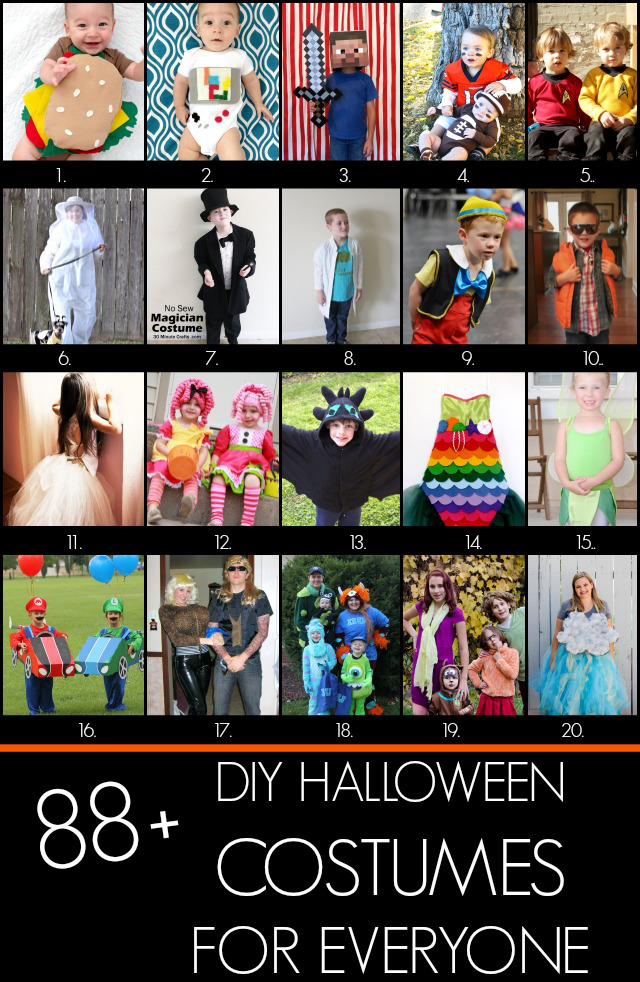 1. Handmade Baby Hamburger Costume 2. DIY Baby Game Boy Costume 3. DIY Minecraft Steve Costume 4. Football Brothers Halloween Costumes with DIY Pads and Onesie 5. Star Trek Halloween Costume for Kids 6. A Bee and Her Keeper 7. No Sew Magician Costume 8. Flint Lockwood Costume 9. Pinocchio 10. Marty McFly 11. Princess Wedding Dress Costume 12. Handmade Lalaloopsy Doll Costume 13. Homemade Toothless Costume 14. DIY Mermaid For Less Than $20 (No-Sew Option) 15. Easy Tinker Bell Costume 16. Mario and Luigi Go Kart Costumes 17. Dog The Bounty Hunter and Beth 18. Family Monsters University Costumes 19. Scooby Doo family costumes 20. DIY Storm Cloud Costume
 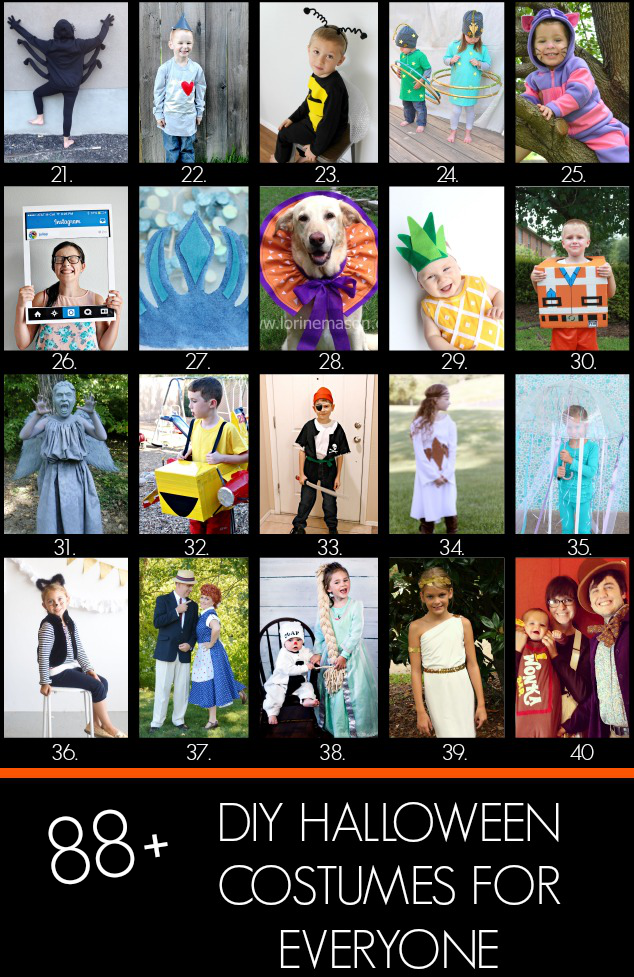 21. Cheap and Easy DIY Spider Costume 22. Easy Tin Man Costume 23. No Sew Bee Costume 24. Planet Halloween Costumes 25. DIY Cheshire Cat Costume 26. DIY Instagram Board 27. Elsa crown 28. Dog Collar Ruffles 29. DIY Pineapple Baby Costume 30. DIY Lego Movie Costume 31. Weeping Angel Costume 32. Disney Planes Costume: Dipper 33. Easy Pirate Costume 34. Easy Costume Idea – Renaissance Girl 35. 10 Minute Homemade Jellyfish Costume 36. DIY Cat Costume 37. Lucy And Ricky Costumes 38. Easy Frozen Costumes (Carrisa!!) 39. Easy Greek Goddess Costume 40. DIY Family Willy Wonka Costumes
 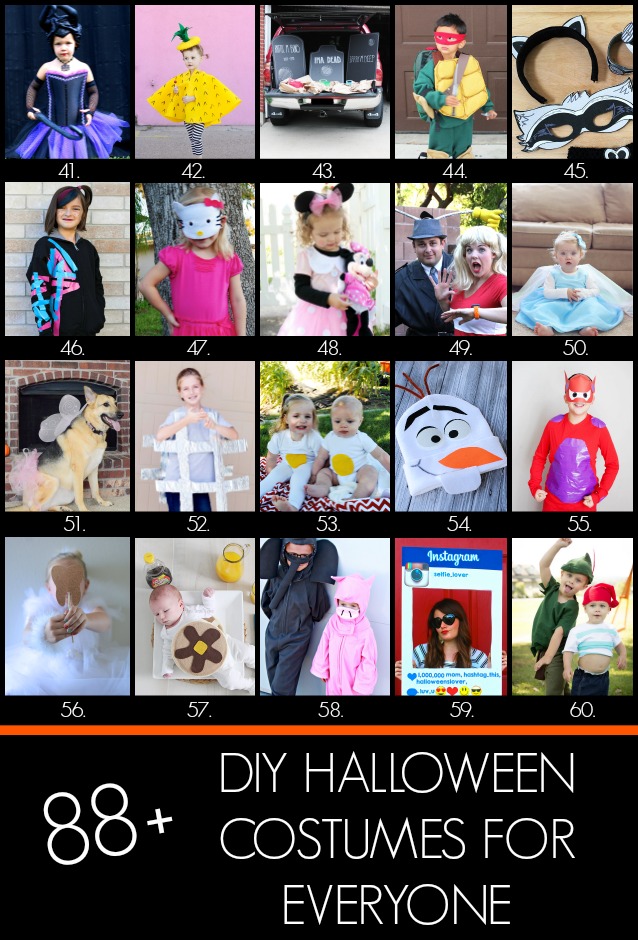 41. DIY No Sew Maleficent Costume 42. No Sew Pineapple Halloween Costume 43. Graveyard Bean Bag Toss: Trunk or Treat Car Costume 44. DIY Teenage Mutant Ninja Turtles Costumes 45. DIY Raccoon Costume with Printable Mask 46. Easy WildStyle Lego Movie Costume 47. Simple Hello Kitty Costume 48. No Sew Minnie Mouse Costume 49. DIY Inspector Gadget and Penny Costumes 50. DIY Frozen Elsa Dress Baby Edition 51. Fairy Princess Dog Costume 52. DIY Hashtag Halloween Costume 53. Toddler or Baby Egg Costume 54. Easy No Sew Olaf Costume 55. DIY Baymax Costume 56. DIY Tooth Fairy Costume 57. Baby Short Stack Pancake Costume 58. Elephant and Piggie Halloween Costumes 59. Instagram Halloween Costume 60. Peter Pan & Mr. Smee Halloween Costume
 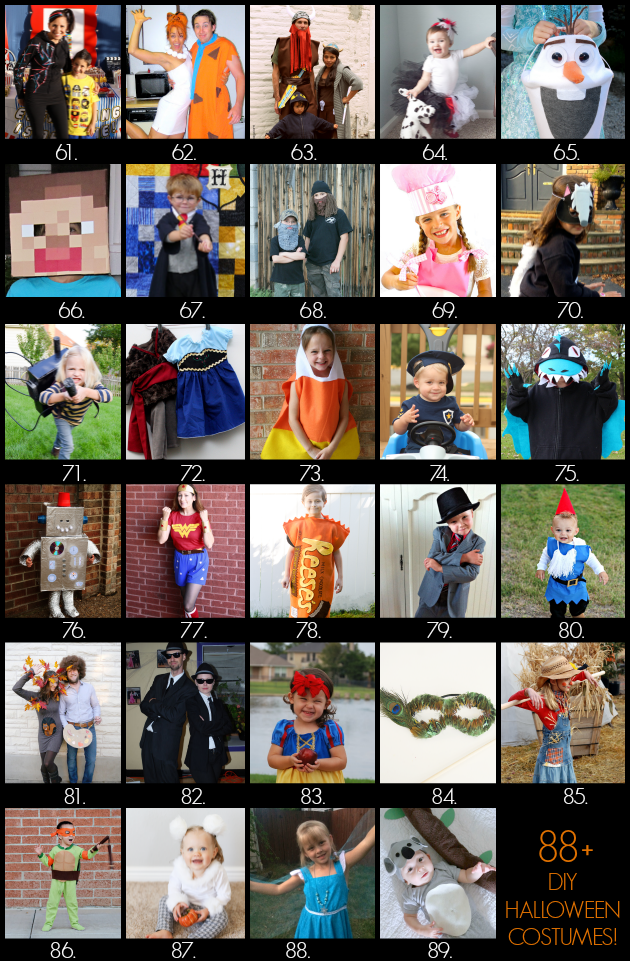 61. Wildstyle Costume from the Lego Movie 62. Fred and Wilma Couples Costume 63. Viking Family Costumes 64. DIY Cruella de Vil Costume for a child 65. Disney Frozen Olaf Halloween Treat Bucket 66. How to Make a Minecraft Steve Head 67. DIY Harry Potter Costume 68. DIY Duck Dynasty Costumes 69. No Sew Cupcake Baker Halloween Costume 70. DIY Skunk Mask 71. Ghostbusters Proton Pack DIY 72. Frozen Anna Costume Tutorial 73. Candy Corn Costume 74. Paw Patrol Halloween Costume 75. No Sew Toothless Dragon Costume 76. DIY Robot Costume 77. Wonder Woman Costume 78. Reese’s Peanut Butter Cup Costume 79. Thrifted Gentleman Spy DIY Halloween Costume 80. DIY Boy Garden Gnome Costume 81. Group Costume: Bob Ross, Happy Tree, & Squirrel 82. DIY Blues Brothers Costumes 83. Snow White Costume 84. Peacock Princess Costume 85. Scarecrow Costume 86. Easy Teenage Mutant Ninja Turtle Costume 87. Handmade Teddy Bear Costume 88. Princess Elsa and the Spy Kid 89. DIY Baby Koala costume
What handmade costume ideas did you love the most?! Be sure to click over to get the costume instructions, pin the costume, and let them know you love it! Also, follow the Handmade Halloween Costume board on Pinterest! Follow Jamie Dorobek {C.R.A.F.T.}’s board “Handmade Halloween Costumes” on Pinterest.
Let’s connect! You can also find me hanging out here.


Janelle says
I need this for my (very large) 7 month old!!! Does anyone want to make one and sell it to me???? Pretty please!!! I already have an Anna and Olaf for Halloween and oh, how they would LOVE if baby sister was Anna!! Jcm822 (at) gmail (dot) com
Elisa says
Adorable! Great tutorial.
Danna says
I made this for my grand daughter. Thanks for the tutorial and the idea. I made mine a little differently, but your tutorial was very helpful. Thanks!
marissa says
Yay I’m glad it could help!